


Friday, 6 December 2013
How to disable back button in browser
Add onload="noBack();" onpageshow="if (event.persisted) noBack();" on body tag.
Example :
<html xmlns="http://www.w3.org/1999/xhtml" >
<head runat="server">
<title>Untitled Page</title>
</head>
<body onload="noBack();" onpageshow="if (event.persisted) noBack();">
<form id="form1" runat="server" >
<div>
login name : <asp:TextBox ID="TextBox1" runat="server"></asp:TextBox> <br />
password :<asp:TextBox ID="TextBox2" runat="server"></asp:TextBox> <br />
<asp:Button ID="Button1" runat="server" Text="ok" />
</div>
</form>
</body>
</html>
Monday, 2 December 2013
prevent page refresh on button click in asp.net c#
.aspx code
<html xmlns="http://www.w3.org/1999/xhtml" >
<head runat="server">
<title>Ajax Update panel</title>
</head>
<body>
<form id="form1" runat="server">
<div>
<asp:ScriptManager ID="ScriptManager1" runat="server"/>
<asp:UpdatePanel ID="UpdatePanel1" runat="server" UpdateMode="Conditional">
<ContentTemplate>
panel 1:<asp:Label ID="Label1" runat="server"></asp:Label>
</ContentTemplate>
</asp:UpdatePanel>
<asp:UpdatePanel ID="UpdatePanel2" runat="server" UpdateMode="Conditional">
<ContentTemplate>
panel 2:<asp:Label ID="Label2" runat="server" ></asp:Label>
<asp:Button ID="Button1" runat="server" Text="Button" onclick="Button1_Click" />
</ContentTemplate>
<Triggers>
<asp:AsyncPostBackTrigger ControlID="Button1"/>
</Triggers>
</asp:UpdatePanel>
</div>
</form>
</body>
</html>
.cs page
protected void Page_Load(object sender, EventArgs e)
{
Label1.Text = DateTime.Now.ToString();
Label2.Text = DateTime.Now.ToString();
}
protected void Button1_Click(object sender, EventArgs e)
{
Label1.Text = DateTime.Now.ToString();
Label2.Text = DateTime.Now.ToString();
}
Saturday, 12 October 2013
Stylish Animated Tooltip in Asp.net

Hi friend's today i am explain about stylish tool tip for asp.net with animated effects .
It is very easy to embed to your webpages.You can also see change gridview row color based on data
and hide or visible div tag on button click .
ASp.net page.
<form id="form1" runat="server">
<div>
<div style="margin-top:150px">
dreamtheweb.com
<a href="#" class="tt">? <span class="tt-info"> (Tool tip Information )</span> </a>
</div>
</div>
</form>
.CSS
<style type="text/css">
.tt
{
background-color:#e2e2e2;
color:#878787;
border-radius:50%;
padding:2px 4px;
display:inline-block;
position:relative;
line-height:1;
font-size:9px;
font-size:0.9rem;
-webkit-transition:all 300ms ease;
transition:all 300ms ease
}
.tt-info{
font-size:1.2rem;
bottom:42px;
display:none;
position:absolute;
width:200px;
margin-left:-20px;
padding:10px;
color:#383838;
background:#fff;
border-collapse:separate;
box-shadow:0 0 5px 0 rgba(0,0,0,0.2);
border:1px solid #009FC4;
text-align:center;
line-height:1.2
}
.tt-info:before,.tt-info:after
{
content:"";
width:0;
height:0;
margin:0 0 0 -10px;
position:absolute;
left:20px;
bottom:-24px;
border-width:12px;
border-style:solid;
border-color:#009FC4 transparent transparent
}
.tt-info:after
{
bottom:-23px;
border-color:#fff transparent transparent;
}
@-moz-document url-prefix()
{.tt-info{opacity:0;
display:block;
pointer-events:none;
transition:all 300ms ease-out;
transform:scale(0.75) rotateX(90deg);
transform-origin:50% 100%
}
.tt:hover .tt-info,.tt.opened .tt-info
{
opacity:1;
transform:scale(1) rotateX(0)
}
</style>
Tips: You can easy to change width,color ,font size etc on .tt-info class style.
Tuesday, 8 October 2013
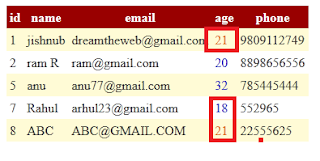
change gridview row color based on data
Check hide or visible div tag on button click and export grid into excel simple way using Asp.net
Hi friends today i discuss about change row color of grid view based on data.
here is the asp.net code.
Before do this you need to convert your required column into template field .
<html xmlns="http://www.w3.org/1999/xhtml" >
<head runat="server">
<title>Untitled Page</title>
</head>
<body>
<form id="form1" runat="server">
<div>
<asp:GridView ID="GridView1" runat="server" AutoGenerateColumns="False" ondatabound="GridView1_DataBound"
CellPadding="4" DataKeyNames="id" DataSourceID="SqlDataSource1"
ForeColor="#333333" GridLines="None">
<RowStyle BackColor="#FFFBD6" ForeColor="#333333" />
<Columns>
<asp:BoundField DataField="id" HeaderText="id" InsertVisible="False"
ReadOnly="True" SortExpression="id" />
<asp:BoundField DataField="name" HeaderText="name" SortExpression="name" />
<asp:BoundField DataField="email" HeaderText="email" SortExpression="email" />
<asp:TemplateField HeaderText="age" SortExpression="age">
<EditItemTemplate>
<asp:TextBox ID="TextBox1" runat="server" Text='<%# Bind("age") %>'></asp:TextBox>
</EditItemTemplate>
<ItemTemplate>
<asp:Label ID="Label1" runat="server" Text='<%# Bind("age") %>'></asp:Label>
</ItemTemplate>
</asp:TemplateField>
<asp:BoundField DataField="phone" HeaderText="phone" SortExpression="phone" />
</Columns>
<FooterStyle BackColor="#990000" Font-Bold="True" ForeColor="White" />
<PagerStyle BackColor="#FFCC66" ForeColor="#333333" HorizontalAlign="Center" />
<SelectedRowStyle BackColor="#FFCC66" Font-Bold="True" ForeColor="Navy" />
<HeaderStyle BackColor="#990000" Font-Bold="True" ForeColor="White" />
<AlternatingRowStyle BackColor="White" />
</asp:GridView>
</div>
<asp:SqlDataSource ID="SqlDataSource1" runat="server"
ConnectionString="<%$ ConnectionStrings:dreamthewebConnectionString %>"
SelectCommand="SELECT [id], [name], [email], [age], [phone] FROM [account]"></asp:SqlDataSource>
</form>
</body>
</html>
The code behind section [.cs page]
add this first
using System.Drawing;
protected void Page_Load(object sender, EventArgs e)
{
}
protected void GridView1_DataBound(object sender, EventArgs e)
{
for (int i = 0; i <= GridView1.Rows.Count - 1; i++)
{
Label last = (Label)GridView1.Rows[i].FindControl("Label1");
if (last.Text == "21")
{
last.ForeColor = ColorTranslator.FromHtml("#E16C0F");
}
else
{
last.ForeColor = ColorTranslator.FromHtml("#E16C0");
}
}
}
Download files
Monday, 7 October 2013
Jquery:function()
A function is a piece or block of code that separate from main code and execute wherever needed .
The Most Java script function syntax shown below.
function FUNCTION NAME ( )
{
// Your Codes
}
-a function start with keyword function followed by FUNCTION NAME .
-There are mainly two way to give name to function.
1. First is function deceleration . which create a function with out use of variable assignment .
eg:
function function1( )
{
$("div1").hide();
}
2. The second one is function expression .which use of variable assignment .
eg :
var function1= function( )
{
$("div1").hide();
}
anonymous function :
The other type of function called "anonymous function" .
anonymous function is also called self executing function .that doesnot have a name and it execute immediately when they are found in code.
The other important thing is the variable declare inside these types of function available only at the time of its execution .
eg:
function( )
{
}
Thank you for reading this article. My next article related to java script function ie passing values inside function and return values too . So read our next part and subscribe our free news letter via mail.
Sunday, 11 August 2013
Hide or Visible Div tag on button click
Full code:
<html>
<head>
<title>jQuery Hide and show div content</title>
<script src="http://code.jquery.com/jquery-1.10.1.min.js"></script>
<script src="http://code.jquery.com/jquery-migrate-1.2.1.min.js"></script>
</head>
<body>
<p><h1>Dreamthewebs.blogspot.com</h1></p>
<div id="slide" style="width:250px; height:50px; background-color:Olive; color:White; font-size:large">
Click Click show and hide button<br />
dreamthewbs.blogspot.com
</div>
<br />
<button id="hide"> Hide</button>
<button id="show">Show </button>
<script>
$(document).ready(function()
{
$("#hide").click(function()
{
//code for show
$("#slide").hide();
});
//code for show
$("#show").click(function()
{
$("#slide").show();
});
});
</script>
</body>
</html>
Demo
Change text color on button click
Today i show Change text color on button click event using jQuery . You can implement this on asp,html etc
Full Code:
<html>
<head>
<title>jQuery color change</title>
<script src="http://code.jquery.com/jquery-1.10.1.min.js"></script>
<script src="http://code.jquery.com/jquery-migrate-1.2.1.min.js"></script>
</head>
<body>
<p><h1>Dreamthewebs.blogspot.com</h1></p>
<button id="color" > Change color</button>
<script>
$(document).ready(function()
{
//change color
$("h1").css({"color":"red" });
$("#color").click( function()
{
$("h1").css({"color":"blue" });
});
});
</script>
</body>
</html>
Demo
Dreamthewebs.blogspot.com
How to read Multiple Values From Table using single SqlCommand and Display values in Label
Hi friends today i shows How to read Multiple Values From Table using single SqlCommand and
Display values in Label using SqlDataReader . Simple way to export grid view into excel . How to read a data from database and display in a Label. are our previous posts .
Table values:
Table values:

.Aspx page
protected void Page_Load(object sender, EventArgs e)
{
SqlConnection con = new SqlConnection("Data Source=JISHNU\\SQLEXPRESS;Initial Catalog=dreamtheweb;Integrated Security=True");
String str = "SELECT [name], [email], [phone] FROM [account] WHERE ([id] = 1)";
SqlCommand cmd = new SqlCommand(str, con);
con.Open();
SqlDataReader dr = cmd.ExecuteReader();
if (dr.Read())
{
Label1.Text = dr["name"].ToString();
Label2.Text = dr["email"].ToString();
Label3.Text = dr["phone"].ToString();
}
con.Close();
}
.CS page:
<form id="form1" runat="server">
<div>
<asp:Label ID="Label1" runat="server" Text="Label"></asp:Label>
<br />
<asp:Label ID="Label2" runat="server" Text="Label"></asp:Label>
<br />
<asp:Label ID="Label3" runat="server" Text="Label"></asp:Label>
<br />
</div>
</form>
Result

Read our next post
Monday, 5 August 2013
Export Grid into Excel (Simple way)
Design:

Database:

Design code:
<form id="form1" runat="server">
<div>
<asp:GridView ID="GridView1" runat="server" CellPadding="4" ForeColor="#333333"
GridLines="None" AutoGenerateColumns="False" DataSourceID="SqlDataSource1">
<RowStyle BackColor="#E3EAEB" />
<Columns>
<asp:BoundField DataField="name" HeaderText="name" SortExpression="name" />
<asp:BoundField DataField="email" HeaderText="email" SortExpression="email" />
<asp:BoundField DataField="age" HeaderText="age" SortExpression="age" />
<asp:BoundField DataField="phone" HeaderText="phone" SortExpression="phone" />
</Columns>
<FooterStyle BackColor="#1C5E55" Font-Bold="True" ForeColor="White" />
<PagerStyle BackColor="#666666" ForeColor="White" HorizontalAlign="Center" />
<SelectedRowStyle BackColor="#C5BBAF" Font-Bold="True" ForeColor="#333333" />
<HeaderStyle BackColor="#1C5E55" Font-Bold="True" ForeColor="White" />
<EditRowStyle BackColor="#7C6F57" />
<AlternatingRowStyle BackColor="White" />
</asp:GridView>
<br />
<asp:Button ID="Button1" runat="server" onclick="Button1_Click"
Text="export to Excel" />
</div>
<asp:SqlDataSource ID="SqlDataSource1" runat="server"
ConnectionString="<%$ ConnectionStrings:dreamthewebConnectionString %>"
SelectCommand="SELECT [name], [email], [age], [phone] FROM [account]"></asp:SqlDataSource>
</form>
.cs page:
protected void Button1_Click(object sender, EventArgs e)
{
Response.Clear();
Response.Charset = "";
Response.AddHeader("content-disposition","attachment;filename=account.xls");
Response.ContentType = "application/vnd.ms-excel";
Response.Buffer = true;
StringWriter strinwrter = new StringWriter();
HtmlTextWriter htmlwrter = new HtmlTextWriter(strinwrter);
Table table1 = new Table();
TableRow tablerow1 = new TableRow();
TableCell tablecell1 = new TableCell();
tablecell1.Controls.Add(GridView1);
tablerow1.Cells.Add(tablecell1);
table1.Rows.Add(tablerow1);
table1.RenderControl(htmlwrter);
string style = @"<style> .textmode { mso-number-format:\@; } </style>";
Response.Write(style);
Response.Output.Write(strinwrter.ToString());
Response.Flush();
Response.End();
}
How to read a data from database and display in a Label
HI friends today i shows how to read data from table and display in a table. Read our previous posts:
How to Load Checklist With Database Table Value and How to insert value into a table in ASP.net (
Database :
Design :

Code:
<form id="form1" runat="server">
<div>
<br />
Your Phone number is:
<asp:Label ID="Label1" runat="server"></asp:Label>
<br /><asp:Button ID="Button1" runat="server" onclick="Button1_Click"
</div>
</form>
.CS page
protected void Button1_Click(object sender, EventArgs e)
{
SqlConnection con = new SqlConnection("Data Source=JISHNU\\SQLEXPRESS;Initial Catalog=dreamtheweb;Integrated Security=True");
SqlCommand phone = new SqlCommand("select phone from account where id='1' ", con);
con.Open();
decimal ph = (decimal)phone.ExecuteScalar();
Label1.Text = Convert.ToString(ph);
con.Close();
}
Note: phone number is a numeric type so convert first .
If you get name from database you can directly insert to label without Convert.ToString()
How to Load Checklist With Database Table Value and How to insert value into a table in ASP.net (
Database :
Design :
Code:
<form id="form1" runat="server">
<div>
<br />
Your Phone number is:
<asp:Label ID="Label1" runat="server"></asp:Label>
<br /><asp:Button ID="Button1" runat="server" onclick="Button1_Click"
</div>
</form>
.CS page
protected void Button1_Click(object sender, EventArgs e)
{
SqlConnection con = new SqlConnection("Data Source=JISHNU\\SQLEXPRESS;Initial Catalog=dreamtheweb;Integrated Security=True");
SqlCommand phone = new SqlCommand("select phone from account where id='1' ", con);
con.Open();
decimal ph = (decimal)phone.ExecuteScalar();
Label1.Text = Convert.ToString(ph);
con.Close();
}
Note: phone number is a numeric type so convert first .
If you get name from database you can directly insert to label without Convert.ToString()
Cannot implicitly convert type 'decimal' to 'string' {Solved}
Error Page:
protected void Button1_Click(object sender, EventArgs e)
{
SqlConnection con = new SqlConnection("Data Source=JISHNU\\SQLEXPRESS;Initial Catalog=dreamtheweb;Integrated Security=True");
con.Open();
SqlCommand phone = new SqlCommand("select phone from account where id='1' ", con);
decimal phone1 = (decimal)phone.ExecuteScalar();
Label1.Text = phone1;
}
Reason: This type of error detected due to absence conversion of data type .
Solution: Use Convert.ToDatatype(variable);
ie
protected void Button1_Click(object sender, EventArgs e)
{
SqlConnection con = new SqlConnection("Data Source=JISHNU\\SQLEXPRESS;Initial Catalog=dreamtheweb;Integrated Security=True");
SqlCommand phone = new SqlCommand("select phone from account where id='1' ", con);
con.Open();
decimal ph = (decimal)phone.ExecuteScalar();
Label1.Text = Convert.ToString(ph);
con.Close();
}
protected void Button1_Click(object sender, EventArgs e)
{
SqlConnection con = new SqlConnection("Data Source=JISHNU\\SQLEXPRESS;Initial Catalog=dreamtheweb;Integrated Security=True");
con.Open();
SqlCommand phone = new SqlCommand("select phone from account where id='1' ", con);
decimal phone1 = (decimal)phone.ExecuteScalar();
Label1.Text = phone1;
}
Reason: This type of error detected due to absence conversion of data type .
Solution: Use Convert.ToDatatype(variable);
ie
protected void Button1_Click(object sender, EventArgs e)
{
SqlConnection con = new SqlConnection("Data Source=JISHNU\\SQLEXPRESS;Initial Catalog=dreamtheweb;Integrated Security=True");
SqlCommand phone = new SqlCommand("select phone from account where id='1' ", con);
con.Open();
decimal ph = (decimal)phone.ExecuteScalar();
Label1.Text = Convert.ToString(ph);
con.Close();
}
Sunday, 4 August 2013
How to Load CheckBoxList With Database Table Value
Here I will explain how to Load CheckBoxList With Database Table Value using asp:CheckBoxList and asp:SqlDataSource.

Table Definition :
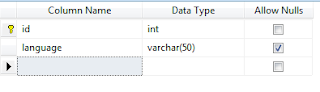
Table value

Code :
<asp:CheckBoxList ID="CheckBoxList2" runat="server"
DataSourceID="SqlDataSource1" DataTextField="language" DataValueField="id">
</asp:CheckBoxList>
<asp:SqlDataSource ID="SqlDataSource1" runat="server"
ConnectionString="<%$ ConnectionStrings:dreamthewebConnectionString %>"
SelectCommand="SELECT [id], [language] FROM [language]"></asp:SqlDataSource>
Result:

Read how to use aspnet checkboxlist
Table Definition :
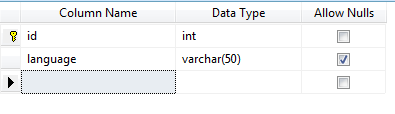
Table value
Code :
<asp:CheckBoxList ID="CheckBoxList2" runat="server"
DataSourceID="SqlDataSource1" DataTextField="language" DataValueField="id">
</asp:CheckBoxList>
<asp:SqlDataSource ID="SqlDataSource1" runat="server"
ConnectionString="<%$ ConnectionStrings:dreamthewebConnectionString %>"
SelectCommand="SELECT [id], [language] FROM [language]"></asp:SqlDataSource>
Result:
Read how to use aspnet checkboxlist
How to Use Asp.net CheckBoxList
Asp.net check box list is used to display more than one check box's .Using this we can display check box directly or from database .
Syntax :
<asp:CheckBoxList ID="CheckBoxList ID" runat="server">
<asp:ListItem Value="value"> Check box text </asp:ListItem>
</asp:CheckBoxList>
asp:ListItem is used to specify the check box list items, using this we can create multiple items.
Example:
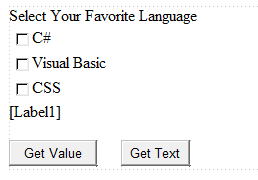
Display favorite Language :
Design:
Code:
<form id="form1" runat="server">
<div>
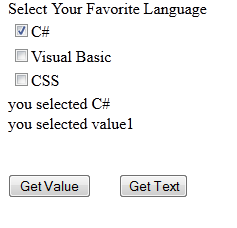
Select Your Favorite Language
<asp:CheckBoxList ID="CheckBoxList1" runat="server" >
<asp:ListItem Value="value1">C#</asp:ListItem>
<asp:ListItem Value="value2">Visual Basic</asp:ListItem>
<asp:ListItem Value="value3">CSS</asp:ListItem>
</asp:CheckBoxList>
<asp:Label ID="Label1" runat="server"></asp:Label>
<br />
<br />
<asp:Button ID="Button1" runat="server" Text="Get Value"
onclick="Button1_Click" />
<asp:Button ID="Button2" runat="server" onclick="Button2_Click" Text="Get Text"
Width="69px" />
</div>
</form>
.CS Page
//Button 1 retrieve Text value of current selection
protected void Button1_Click(object sender, EventArgs e)
{
foreach (ListItem item in CheckBoxList1.Items)
{
if (item.Selected == true)
{
Label1.Text += "you selected " + item.Text + "<br />";
}
}
}
//Button 2 retrieve ID value of current selection
protected void Button2_Click(object sender, EventArgs e)
{
foreach (ListItem item in CheckBoxList1.Items)
{
if (item.Selected == true)
{
Label1.Text += "you selected " + item.Value + "<br />";
}
}
}
Result:
Syntax :
<asp:CheckBoxList ID="CheckBoxList ID" runat="server">
<asp:ListItem Value="value"> Check box text </asp:ListItem>
</asp:CheckBoxList>
asp:ListItem is used to specify the check box list items, using this we can create multiple items.
Example:
Display favorite Language :
Design:
Code:
<form id="form1" runat="server">
<div>
Select Your Favorite Language
<asp:CheckBoxList ID="CheckBoxList1" runat="server" >
<asp:ListItem Value="value1">C#</asp:ListItem>
<asp:ListItem Value="value2">Visual Basic</asp:ListItem>
<asp:ListItem Value="value3">CSS</asp:ListItem>
</asp:CheckBoxList>
<asp:Label ID="Label1" runat="server"></asp:Label>
<br />
<br />
<asp:Button ID="Button1" runat="server" Text="Get Value"
onclick="Button1_Click" />
<asp:Button ID="Button2" runat="server" onclick="Button2_Click" Text="Get Text"
Width="69px" />
</div>
</form>
.CS Page
//Button 1 retrieve Text value of current selection
protected void Button1_Click(object sender, EventArgs e)
{
foreach (ListItem item in CheckBoxList1.Items)
{
if (item.Selected == true)
{
Label1.Text += "you selected " + item.Text + "<br />";
}
}
}
//Button 2 retrieve ID value of current selection
protected void Button2_Click(object sender, EventArgs e)
{
foreach (ListItem item in CheckBoxList1.Items)
{
if (item.Selected == true)
{
Label1.Text += "you selected " + item.Value + "<br />";
}
}
}
Result:
Saturday, 3 August 2013
How to insert value into a table in ASP.net (Simple Way)
Hi friends Today i tell about very common and simple method for insert value into a table using ASP.NET for absolute beginners.
The table definition is shown below

Then the code is shown below

-->
<form id="form1" runat="server">
<div>
Name:
<asp:TextBox ID="TextBox1" runat="server"></asp:TextBox>
<br />
Email
<asp:TextBox ID="TextBox2" runat="server"></asp:TextBox>
<br />
Age
<asp:TextBox ID="TextBox3" runat="server"></asp:TextBox>
<br />
<asp:Button ID="Button1" runat="server" onclick="Button1_Click"
style="height: 26px" Text="Button" />
</div>
</form>
Double click on button and insert the below code into .cs page.
protected void Button1_Click(object sender, EventArgs e)
{
SqlConnection con = new SqlConnection("Data Source=JISHNU\\SQLEXPRESS;Initial Catalog=dreamtheweb;Integrated Security=True");
con.Open();
SqlCommand cmd = new SqlCommand("insert into account (name,email,age)values ('"+TextBox1.Text+"','"+TextBox2.Text+"','"+TextBox3.Text+"') ");
cmd.Connection = con;
int i = cmd.ExecuteNonQuery();
con.Close();
}
Result:

Thank you..Our next section is insert values into table using Stored procedure (SP).
The table definition is shown below
Then the code is shown below
-->
<form id="form1" runat="server">
<div>
Name:
<asp:TextBox ID="TextBox1" runat="server"></asp:TextBox>
<br />
Email
<asp:TextBox ID="TextBox2" runat="server"></asp:TextBox>
<br />
Age
<asp:TextBox ID="TextBox3" runat="server"></asp:TextBox>
<br />
<asp:Button ID="Button1" runat="server" onclick="Button1_Click"
style="height: 26px" Text="Button" />
</div>
</form>
Double click on button and insert the below code into .cs page.
protected void Button1_Click(object sender, EventArgs e)
{
SqlConnection con = new SqlConnection("Data Source=JISHNU\\SQLEXPRESS;Initial Catalog=dreamtheweb;Integrated Security=True");
con.Open();
SqlCommand cmd = new SqlCommand("insert into account (name,email,age)values ('"+TextBox1.Text+"','"+TextBox2.Text+"','"+TextBox3.Text+"') ");
cmd.Connection = con;
int i = cmd.ExecuteNonQuery();
con.Close();
}
Result:
Thank you..Our next section is insert values into table using Stored procedure (SP).
Friday, 2 August 2013
If else condition in Sql
If else conditions are used to test conditions ,It is used in stored procedure(SP),Trigger etc
The execution of if else statement is same as C or C++ Language .
Syntax:
IF (Condition)
BEGIN
Sql statements 1
ENd
ELSe
BEGIN
Sql statements 2
END
Explanation :
If condition is true execute Sql statements1 otherwise execute Sql statements2 .
Example:
IF (10<2)
BEGIN
select name from account
ENd
ELSe
BEGIN
select * from account
END
Result:
The above example execute Sql statements 2 ie, select * from account
Thursday, 18 July 2013
Display combobox values from database
hi friends in this section i cover read data from database and display it on combobox using ext.net.
if you dont know session statement read our session tuts.

The procedure shown in the below ie.
first insert combobox and SqlDataSource into the project
id-integer type
name-varchar(50)
if you dont know session statement read our session tuts.
The procedure shown in the below ie.
first insert combobox and SqlDataSource into the project
<form id="form1" runat="server">
<div>
<ext:ComboBox ID="dreamtheweb" runat="server" AnchorHorizontal="100%" DisplayField="name"
ValueField="id" FieldLabel="Country">
<Store>
<ext:Store ID="sestore1" runat="server" DataSourceID="SqlDataSource1">
<Model>
<ext:Model ID="Model1" runat="server">
<Fields>
<ext:ModelField Name="id" />
<ext:ModelField Name="name">
</ext:ModelField>
</Fields>
</ext:Model>
</Model>
</ext:Store>
</Store>
</ext:ComboBox>
</div>
<asp:SqlDataSource ID="SqlDataSource1" runat="server"
ConnectionString="<%$ ConnectionStrings:testing %>"
SelectCommand="SELECT * FROM [country] ">
</asp:SqlDataSource>
</form>
Insert connection string testing in web.config file<div>
<ext:ComboBox ID="dreamtheweb" runat="server" AnchorHorizontal="100%" DisplayField="name"
ValueField="id" FieldLabel="Country">
<Store>
<ext:Store ID="sestore1" runat="server" DataSourceID="SqlDataSource1">
<Model>
<ext:Model ID="Model1" runat="server">
<Fields>
<ext:ModelField Name="id" />
<ext:ModelField Name="name">
</ext:ModelField>
</Fields>
</ext:Model>
</Model>
</ext:Store>
</Store>
</ext:ComboBox>
</div>
<asp:SqlDataSource ID="SqlDataSource1" runat="server"
ConnectionString="<%$ ConnectionStrings:testing %>"
SelectCommand="SELECT * FROM [country] ">
</asp:SqlDataSource>
</form>
<connectionStrings>
<add name="testing" connectionString="Data Source=jishnu\sqlexpress;Initial Catalog=gatikktechno;Integrated Security=True;Pooling=False"/>
</connectionStrings>
Database definition<add name="testing" connectionString="Data Source=jishnu\sqlexpress;Initial Catalog=gatikktechno;Integrated Security=True;Pooling=False"/>
</connectionStrings>
id-integer type
name-varchar(50)
Asp.net Session With Example
Here i explain asp.net session using c#.
Session state is mainly used to transfer values from one page to other without storing/retrieving values from database.
In this tutorial two files one is first.aspx and other is second.aspx.
first.aspx
Add session statement inside button click ie,
Session state is mainly used to transfer values from one page to other without storing/retrieving values from database.
In this tutorial two files one is first.aspx and other is second.aspx.
first.aspx
<%@ Page Language="C#" AutoEventWireup="true" CodeBehind="first.aspx.cs" Inherits="dreamtheweb.first" %>
<!DOCTYPE html PUBLIC "-//W3C//DTD XHTML 1.0 Transitional//EN" "http://www.w3.org/TR/xhtml1/DTD/xhtml1-transitional.dtd">
<html xmlns="http://www.w3.org/1999/xhtml" >
<head runat="server">
<title>Untitled Page</title>
</head>
<body>
<form id="form1" runat="server">
<div>
<asp:TextBox ID="TextBox1" runat="server">Fname</asp:TextBox>
<br /> <br /> <asp:TextBox ID="TextBox2" runat="server">lanme</asp:TextBox>
<br />
<br />
<asp:Button ID="Button1" runat="server" Text="Submit" OnClick="Button1_click" /> <br />
</div>
</form>
</body>
</html>
first.aspx.cs page <!DOCTYPE html PUBLIC "-//W3C//DTD XHTML 1.0 Transitional//EN" "http://www.w3.org/TR/xhtml1/DTD/xhtml1-transitional.dtd">
<html xmlns="http://www.w3.org/1999/xhtml" >
<head runat="server">
<title>Untitled Page</title>
</head>
<body>
<form id="form1" runat="server">
<div>
<asp:TextBox ID="TextBox1" runat="server">Fname</asp:TextBox>
<br /> <br /> <asp:TextBox ID="TextBox2" runat="server">lanme</asp:TextBox>
<br />
<br />
<asp:Button ID="Button1" runat="server" Text="Submit" OnClick="Button1_click" /> <br />
</div>
</form>
</body>
</html>
Add session statement inside button click ie,
protected void Button1_click(object sender, EventArgs e)
{
Session["fname"] = TextBox1.Text;
Session["lname"] = TextBox2.Text;
Response.Redirect("second.aspx");
}
The second.aspx page {
Session["fname"] = TextBox1.Text;
Session["lname"] = TextBox2.Text;
Response.Redirect("second.aspx");
}
<%@ Page Language="C#" AutoEventWireup="true" CodeBehind="second.aspx.cs" Inherits="dreamtheweb.second" %>
<!DOCTYPE html PUBLIC "-//W3C//DTD XHTML 1.0 Transitional//EN" "http://www.w3.org/TR/xhtml1/DTD/xhtml1-transitional.dtd">
<html xmlns="http://www.w3.org/1999/xhtml" >
<head runat="server">
<title>Untitled Page</title>
</head>
<body>
<form id="form1" runat="server">
<div>
<asp:Label ID="Label1" runat="server" Text="Label"></asp:Label>
<br />
<asp:Label ID="Label2" runat="server" Text="Label"></asp:Label>
</div>
</form>
</body>
</html>
For accept session values insert the below code in pageload section ie <!DOCTYPE html PUBLIC "-//W3C//DTD XHTML 1.0 Transitional//EN" "http://www.w3.org/TR/xhtml1/DTD/xhtml1-transitional.dtd">
<html xmlns="http://www.w3.org/1999/xhtml" >
<head runat="server">
<title>Untitled Page</title>
</head>
<body>
<form id="form1" runat="server">
<div>
<asp:Label ID="Label1" runat="server" Text="Label"></asp:Label>
<br />
<asp:Label ID="Label2" runat="server" Text="Label"></asp:Label>
</div>
</form>
</body>
</html>
protected void Page_Load(object sender, EventArgs e)
{
Label1.Text = Session["fname"].ToString();
Label2.Text = Session["lname"].ToString();
}
If you enjoy and work this post please support this blog and visit again {
Label1.Text = Session["fname"].ToString();
Label2.Text = Session["lname"].ToString();
}
Friday, 28 June 2013
Working with Adobe illustrator for beginners Part 3- Artboards

1: Artboard Working Area.
2. Artboard Control panel.
3. Navigation Tools.
4. It also a part of navigation tools .
5. Artboard Tool.
6. Artboard Preset .
7. Artboard Name
Artboards is a region for creating graphics work . It can be created using 2 way , one is specify artboards in new document dialog box and the second one is using Artboard tools ( in fig, no 5 is Artboard Tool). in a tool panel . You can also created by using Artboard Pannel( in fig, no 2 is Artboard panel). If you select Artboard tools from tool box , Everything outside the Artboard working area appears dark and dashed lines appears on Artboard (see fig:) . Artboard control panel shows all Artboards you created ,if your Artboard panel is hidden you can access it through Window menu .You can do Show or hide artboard,resize ,delete and switch to specific Artboard etc operations in Artboard Panel. For viewing purpose either in Outline mode or preview mode it can be done by just click Ctrl+Y . My next post is creating ,selecting and modifying shapes using Tools, So dont forget to subscribe dreamtheweb.com and visit daily ... Thank you .......
Best 3 blogger templates top download 2013
1.Revolution Church
- Template Designer-Brian Gardner
- wordpress templates converted into blogger templates .
- Developer -Bloganol
- 486x60 Ads ready
- SEO friendly templates.

>> Download this templates
>> View Demo
2. labnol

- Best Blogger templates in 2013
- mils of downloads
- SEO optimized.
- High earning adsense optimized templates
- Download This templates
view demo
3.Estyle

- Estyle stylish blogger templates
- Ads ready ..
- Seo optimized.Download this templates
View Demo
create a simple program usig php variable
Hello friends yesterday I told about how to install Apach using XAMPP Server .You can easy access your files via http://localhost/phpmyadmin/programname.php If your file is in PhpMyAdmin Directory.
Also you can access your file via http://localhost/phpmyadmin/foldername/programname.php If your file is saved in Your own folder, The second method is very usefull for creating a php based projects.
Let start to create a simple program usig php variable.
<html>
<head>
<title>My First Php Program</title>
</head>
<body>
<h2>Demonstrates using General H1 Tage</h2>
<div><h3>dreamtheweb.com </h3>
<h2>Demonstrates using a variable</h2>
<div>
<?php
$name= "dreamtheweb.com";
print "welcome to, $name";
?>
</div>
</body>
</html>
Save it as myphpprogram.php
out put

The line $name = “dreamtheweb.com”; does two major things. First it creates a new variable named
$name and the second is it will assign the value “dreamtheweb.com” to the variable. In PHP Language , all variables start with a $ (dollar sign ) and the The variable’s name is user defint one except some rools. The assignment symbols (=) is generally used for assignment operations.
The next one is printing a variables value ,If you want to print the value of a variable, simply place the variable name in the text you want printed.
Ie following line:
print “welcome to , $name”;
It actually produces the output:
Welcome to, dreamtheweb.com (Look fig ph1) That its.
The next section we will discuss about displaying word or text using somr other way …
So please keep dreamtheweb.com daily …
Also you can access your file via http://localhost/phpmyadmin/foldername/programname.php If your file is saved in Your own folder, The second method is very usefull for creating a php based projects.
Let start to create a simple program usig php variable.
<html>
<head>
<title>My First Php Program</title>
</head>
<body>
<h2>Demonstrates using General H1 Tage</h2>
<div><h3>dreamtheweb.com </h3>
<h2>Demonstrates using a variable</h2>
<div>
<?php
$name= "dreamtheweb.com";
print "welcome to, $name";
?>
</div>
</body>
</html>
Save it as myphpprogram.php
out put
The line $name = “dreamtheweb.com”; does two major things. First it creates a new variable named
$name and the second is it will assign the value “dreamtheweb.com” to the variable. In PHP Language , all variables start with a $ (dollar sign ) and the The variable’s name is user defint one except some rools. The assignment symbols (=) is generally used for assignment operations.
The next one is printing a variables value ,If you want to print the value of a variable, simply place the variable name in the text you want printed.
Ie following line:
print “welcome to , $name”;
It actually produces the output:
Welcome to, dreamtheweb.com (Look fig ph1) That its.
The next section we will discuss about displaying word or text using somr other way …
So please keep dreamtheweb.com daily …
Best Online Shadow Generator Tools for div tag
Hello friends today i discuss some online drop shadow Generator websites.Using These site you can very easy to create CSS3 Shadow in your website .
The Best online shadow generator websites are given below,

Go ThemeShock Shadow Generator tool

visit herokuapp
The Best online shadow generator websites are given below,
1. ThemeShock Online Shadow generator
Go ThemeShock Shadow Generator tool
2. herokuapp Online Box Shadow generator
visit herokuapp
Reduce a tag hover delay using new css3
webkit-transition ,moz-transition are used to handle hover delay and make <a> is more stylish , The meager use of these attributes is to design navigation items for example visit teamexcellence.com the main navigation items at .2s provides a nice visual effects with high speed loading .
The main content is
-webkit-transition-property: color;
-webkit-transition-duration: .2s;
-webkit-transition-timing: ease-out;
The webkit-transition-duration is the amount of time required to produce delay (in second)
Consider the example given below :
HTML SECTION
<div >
<h1><a href="http://www.dreamtheWeb.com" >DreamtheWeb.com</a> | <a href="http://www.123Arena.com">123Arena.com</a></h1>
</div>
CSS SECTION
a{
color: #F36;
text-decoration: none;
-webkit-transition: color 0.9s ease-out;
-moz-transition: color 0.9s ease-out;font-weight: bold;
}
a:focus,
a:hover{
color:#3C6;
}
SEE THE DEMO
How to set <ui> list item appears horizontally Using CSS
<ui> list items are commonly used for creating horizontal menu with css effects , I will explain it later posts . Lets comes to our problem ,it is very easy to align unordered list item(<ui>) into horizontally by set display: inline to your css file .
For example :
HTML Section
<ul id="menu">
<li> <a href=""> home</a></li>
<li>> <a href=""> 123arena</a></li>
<li>> <a href=""> Dreamtheweb</a></li>
<li>> <a href=""> google</a></li>
<li>> <a href=""> facebook</a></li>
</ul>
CSS Section
#menu li
{
display: inline;
}
SEE DEMO
For example :
HTML Section
<ul id="menu">
<li> <a href=""> home</a></li>
<li>> <a href=""> 123arena</a></li>
<li>> <a href=""> Dreamtheweb</a></li>
<li>> <a href=""> google</a></li>
<li>> <a href=""> facebook</a></li>
</ul>
CSS Section
#menu li
{
display: inline;
}
SEE DEMO
How to Apply different color links on the same page
In this section i discuss how to apply different color links on same page ,default color of a link is blue for all links. So we can apply different color using css property ,It is very easy to implement in your web page .just set a class name to your hyperlinks
for example : I have a 2 links Link1 and link2 link 1 to be red color and link2 to be green color , So i have declare 2 css property for the link1 and link 2 (ie redcss and greencss) The full code given below :
Normal HTML code:
<html xmlns="http://www.w3.org/1999/xhtml" xml:lang="en" lang="en">
<head>
<title>css link</title>
</head>
<body>
<a href="http://www.google.com" class="greencss">Google.com</a>
<a href="http://dreamtheweb.com.com" class="redcss">DreamtheWeb.com</a>
</body>
</html>
CSS section
a.redcss {color:red;}
a.redcss:link {text-decoration: none; color: red;}
a.redcss:visited {text-decoration: none; color: red;}
a.redcss:hover {text-decoration: underline; color: red;}
a.redcss:active {text-decoration: none; color: red;}
a.greencss {color:blue;}
a.greencss:link {text-decoration: none; color:green;}
a.greencss:visited {text-decoration: none; color: green;}
a.greencss:hover {text-decoration: underline; color: green;}
a.greencss:active {text-decoration: none; color: green;}
View RESULT
ie <a> and write the css based on your requirements.for example : I have a 2 links Link1 and link2 link 1 to be red color and link2 to be green color , So i have declare 2 css property for the link1 and link 2 (ie redcss and greencss) The full code given below :
Normal HTML code:
<html xmlns="http://www.w3.org/1999/xhtml" xml:lang="en" lang="en">
<head>
<title>css link</title>
</head>
<body>
<a href="http://www.google.com" class="greencss">Google.com</a>
<a href="http://dreamtheweb.com.com" class="redcss">DreamtheWeb.com</a>
</body>
</html>
CSS section
a.redcss {color:red;}
a.redcss:link {text-decoration: none; color: red;}
a.redcss:visited {text-decoration: none; color: red;}
a.redcss:hover {text-decoration: underline; color: red;}
a.redcss:active {text-decoration: none; color: red;}
a.greencss {color:blue;}
a.greencss:link {text-decoration: none; color:green;}
a.greencss:visited {text-decoration: none; color: green;}
a.greencss:hover {text-decoration: underline; color: green;}
a.greencss:active {text-decoration: none; color: green;}
View RESULT
Working with Adobe illustrator for beginners Part2
i hope every one understand my first post , 2nd section i discuss about creating a New illustrator Documents with little effort, Every time you create a new document it become fresh or active documents since it is front of all other documents . For Creating a new Documents you can just click File menu and choose New option, Then you can see different s options for creating document the meaning of each one is discussed below Ref Fig: 
1. Name : Name of your documents. 2. New Documents profiles : You can select a Document profile from list , it contain print,web etc 3.Number of Artboards: It specify numer of artboards that should appear initially when create a new documents. 4. size: This list contain standard dimension ,you can Choose a size from this list. 5. Also you can specify your own dimensions using width and height . 6.units: In this you can specify units you prefer to work in.commonly used units are inches ,picas etc. 7.Bleed :This refer how much a document spills outside the defined print area. Ok ... lets move to the next section
1. Name : Name of your documents. 2. New Documents profiles : You can select a Document profile from list , it contain print,web etc 3.Number of Artboards: It specify numer of artboards that should appear initially when create a new documents. 4. size: This list contain standard dimension ,you can Choose a size from this list. 5. Also you can specify your own dimensions using width and height . 6.units: In this you can specify units you prefer to work in.commonly used units are inches ,picas etc. 7.Bleed :This refer how much a document spills outside the defined print area. Ok ... lets move to the next section
Working with Adobe illustrator for beginners Part1
Adobe illustrator is a essential tool for Web designers, video professionals for design purpose ,Generally Illustrator is used for creating rich graphics contents .You can Download Adobe illustrator Trial from adobe official website. In this section we discuss about very basics concepts of Adobe illustrator . Opening Existing Illustrator To open an existing document we first select File from main menu and select Open command then you can see all illustrator file you already created earlier ,select a file you want to open and click Open Ref Fig

Read Our Next Section 2>>
Stylish pure CSS Menu (Horizontal Menu)
Today iam design pure css model menu .
It is very easy to add to your website with little efforts .
Demo Click here
Installation steps:<div id="header-new1">
<div id="main-nav-holder1" style="padding-top: 20px;">
<a href="#" style="margin-left:0;">Home</a>
<a href="#">products</a>
<a href="#">Dreamtheweb.com</a>
<a href="#">Css scripts</a>
<a href="#">Java Scripts</a>
<a href="#">Templates</a>
<a href="#">wordpress</a>
<a href="#" style="margin-right:0;padding:5px 10px;">FAQ</a>
</div>
</div>
CSS Section :
a
{
color: #92b932;
text-decoration: none;
}
.buttonNew
{
background: -webkit-gradient(
linear, left top, left bottom,
from(#9edc71),
color-stop(0.29, #70c939),
to(#6ac532));
-moz-border-radius: 5px;
-webkit-border-radius: 5px;
border-radius: 5px;
border: 1px solid #63b32e;
-moz-box-shadow:
0px 1px 3px rgba(000,000,000,0.5),
inset 0px 0px 1px rgba(255,255,255,0.6);
box-shadow:
0px 1px 3px rgba(000,000,000,0.5),
inset 0px 0px 1px rgba(255,255,255,0.6);
text-shadow:
0px 1px 5px rgba(000,000,000,1),
0px 1px 0px rgba(255,255,255,0.2);
font-weight:bold;
-webkit-transition: box-shadow 1s ease-in-out, color 1s ease-in-out;
-moz-transition: box-shadow 1s ease-in-out, color 1s ease-in-out;
-o-transition: box-shadow 1s ease-in-out, color 1s ease-in-out;
transition: box-shadow 1s ease-in-out, color 1s ease-in-out;
-webkit-box-shadow:
0px 1px 3px rgba(000,000,000,0.5),
inset 0px 0px 1px rgba(255,255,255,0.6);
font-family: Arial, Helvetica, sans-serif;
font-size: 15px;
color: #f0f0f0;
padding: 5px 11px;
margin: 0 2px;
background:#9edc71;
background: -moz-linear-gradient(
top,
#9edc71 0%,
#70c939 29%,
#6ac532);
}
.buttonNew:hover
{
border: 1px solid rgba(0,0,0,0.2);
text-shadow: #ffffff 0 1px 0;
background: #a8a8a8;
background: -webkit-gradient(linear, left top, left bottom, from(#e3e3e3), to(#a8a8a8));
background: -webkit-linear-gradient(top, #e3e3e3, #a8a8a8);
background: -moz-linear-gradient(top, #e3e3e3, #a8a8a8);
background: -ms-linear-gradient(top, #e3e3e3, #a8a8a8);
background: -o-linear-gradient(top, #e3e3e3, #a8a8a8);
background-image: -ms-linear-gradient(top, #e3e3e3 0%, #a8a8a8 100%);
color: #5a5a5a !important;
}
.buttonNew:active
{
text-shadow: #ffffff 0 1px 0;
border: 1px solid rgba(0,0,0,0.2);
background: #949494;
background: -webkit-gradient(linear, left top, left bottom, from(#d6d6d6), to(#a8a8a8));
background: -webkit-linear-gradient(top, #d6d6d6, #949494);
background: -moz-linear-gradient(top, #d6d6d6, #949494);
background: -ms-linear-gradient(top, #d6d6d6, #949494);
background: -o-linear-gradient(top, #d6d6d6, #949494);
background-image: -ms-linear-gradient(top, #d6d6d6 0%, #949494 100%);
color: #000000 !important;
}